
How to Create a Beautiful Cocktail Cabinet
I wanted to take this opportunity to share a piece I have been working on for a customer recently - as I used some fab new products and some old favourites to transform this cocktail cabinet! This is how I created this beautiful cocktail cabinet.
This was the grimiest piece I think I have ever worked on - it took 4 hours to clean!!
Like many old pieces of furniture that need some love and attention it was very smelly and needed a lot of work to get it prepped for upcycling. This is where I used the classic Grime Cutter, which is the perfect solution for cleaning furniture but I also used something new that I NEED to tell you about as the result was seriously good! I used the Grime Cutter in conjunction with the NEW Hermes Abrasive Hand Sanding Pads. I cut a pad into quarters and used them as a scouring sponge/sanding pad combo - and it worked! This really helped to speed things up by cleaning, scrubbing and scuff sanding at the same time! I know what you’re thinking, I’M A GENIUS!

I washed off the Grime Cutter and let it dry thoroughly.
I removed the doors, handles and hinges and gave the hardware a good clean, labelled them and set them aside.
There were a few dings that needed to be filled and fixed - I repaired the veneer and some trim using the Polyvine Cascarez Fast Grab Adhesive Glue and filled missing areas with Dark Prestonett Filler.
I then went over more fiddly areas with my Festool sander and taped off the glass, lighting area, and around the back of the cabinet and the prep was finally complete!
Time to paint!
I painted it inside and out with 3 thin coats of Coal Black by Fusion Mineral Paint using a Cling On S50 brush and Staalmeester Rollers with the Long Handle Frame. As I work in a shaded workshop I used the tiniest bit of water in to improve the flow of paint in the warmer weather, but generally I do recommend General Finishes Extender to help with flow and levelling when the weather turns hot.
Each layer was lightly sanded with Ultra Fine Sanding Pad from General Finishes. As I had prepped the piece well I didn’t use a primer, and with Fusion Mineral Paint being an all in one paint it doesn't require a top coat. The customer was happy with the finish Fusion gives and so no top coat was applied.
Onto the papering the sliding tray… I am no expert at papering and it has been a while since I’ve done it so it was a bit of a challenge!
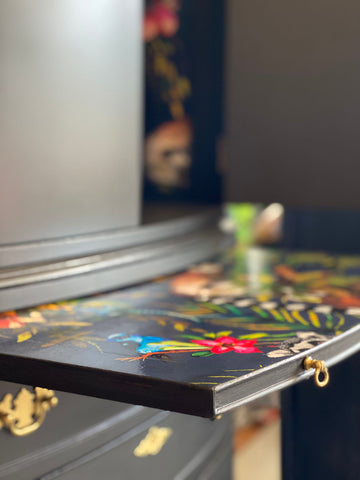
The wallpaper I used was provided by the customer. I used Fusion Decoupage & Transfer Gel as my decoupage medium and made sure to push any air bubbles to the outside edges.
Using my trusty scalpel I trimmed the edges, sanding them down to help with the movement of the tray. Once it was dried, I went in with Deep Sea Silk Paint by Dixie Belle Paint Company to help blend in the edges and create some shading.
I sealed it with General Finishes High Performance Top Coat in Gloss for a high shine finish. With it being a cocktail cabinet tray it was well worth using a gloss finish as it is more resistant to liquids and spillages. I also did a gloss coat on the sides of the cabinet for extra protection.
The hardware was scuff sanded after being cleaned to give it a key for paint to stick to, and they were painted in a mixed of Posh Chalk Pigments in Byzantine Gold and Wedding Gold mixed with the Infusor. The doors and hardware were refitted, the glass cleaned up and tape removed.
Next week It just needs a fancy escutcheon from Woodubend fitted to the keyhole and a lovely big tassel added to the key and it will be done!
I'm really happy with how it has turned out! What do you think?
-
Posted incocktail cabinet