
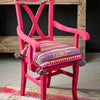
Nooky Gossip 78: How To Paint Waxed Pine Drawers!
This week I wanted to do something a little different with Nooky Gossip so I'm sharing the process of me upcycling waxed pine drawers - from start to finish - and it includes the things that went a bit wrong!
Even as an experienced furniture painter, I make mistakes, experiment with trying new products and techniques, and change my mind along the way! I hope this inspires you to try something new, or encourages you to keep going if it feels like a project or technique has gone wrong - don’t worry - you can pull it back and create something beautiful!
Grab a cuppa, have a read and let me know what you think!

Stage 1: Prep
Prep is always super important - and with a waxed piece of furniture the first place to start is to remove the wax. This is a laborious process but the end result is worth it!
This piece had a thick layer of wax so I started off by scrubbing it with white spirit, a scrubby brush and wire wool. I wiped off the residue and then repeated the process several times.
Next, I cleaned it with Grime Cutter - which is very satisfying as you can see the wax residue just melting away!
I then sanded the piece using my Festool Sander - this a fab bit of kit when working indoors as it has its own extractor fitted.
After sanding I filled any holes with Dixie Belle Mud, let it dry and sanded the excess away.
FYI I didn’t remove the wax from the sides of the drawers - but we’ll come to that later!
The pine was quite knotty so I applied Dixie Belle BOSS to prevent any knots peeping through. Even though I knew I was painting the piece in a dark colour, knots can begin to show through when a top coat is applied so it was worth taking this extra step.
I had an idea of the design I wanted to do - which included leaving areas with wood exposed. I wanted the lines to be crisp so I used Delicate Surface Frog Tape to mask the drawers and the frame surrounding the drawers.
Ideally at this point you know where you want your handles to go on your finished design so this is also a good time to drill the holes for your handles… you may have already guessed that I didn’t know where I wanted the handles yet so I didn’t do this bit…
TOP TIP: Number your drawers - write on the back or underneath them - they often only fit properly in one position so this saves a lot of pain later on!
Stage 2: Paint
I wanted a really smooth and pristine finish so I painted the unit in Dixie Belle's Palmetto using a microfibre roller. I like using the longer handle with the small roller. After letting it dry I very lightly sanded each coat using a Dixie Belle Sanding Sponge to smooth it very lightly using barely any pressure. I did 3 coats in total. After the final coat I did an incredibly light sand - by this point the sanding pad had worn down to a finer grit which helps buff the final coat.
TOP TIP: If the back of your unit is going to be on display - don’t forget to paint it too!
I stained the front of the drawers left as exposed wood by first applying a slip coat of white spirit - applying a slip coat to a raw wood surface to allows the stain to slide across the surface more easily and stops it soaking up too much of the stain - then I applied No Pain Gel Stain in Walnut and wiped it down. After it dried it wasn’t quite as dark as I wanted and so I added a very light second layer of gel stain. I allowed the drawers to cure for 2 days.
I added a pattern using a Dixie Belle stencil and the Palmetto paint to the top 3 drawers - I started with the middle drawer and worked outwards to ensure it looked balanced. I used a Posh Chalk Stencil Brush, dabbed off excess paint and used a swirling motion to apply the paint over the stencil.

Stage 3: Finish
I am a big fan of General Finishes topcoats but I know my customers LOVE Polyvine. It’s not something I have much experience with so I thought this was a good opportunity to get to grips with it! All varnishes have slight differences that means certain techniques are best for certain finishes - and it can be a case of trial and error finding what works for you.
Initially I tried applying the Polyvine Wax Finish Varnish in Satin using an applicator pad but found it went streaky. I switched to using the microfibre roller and wiped off any excess with the applicator pad. There was a bit of an orange peel texture to it - so I went in with General Finishes sanding pads - working my way up to ultrafine grit - to buff it out and now it is super smooth and shiny! I haven’t found my Polyvine technique yet but I will persevere as it looks so lovely and when I have worked it out I won’t need to do the buffing step.
TOP TIP: Oil based stains must be cured before topcoating with a water-based finish!
When I looked at the piece and started putting it together to decide on final looks - it seemed off balance and not cohesive or sleek enough. Originally I had painted the 2nd row of drawers and left the top of the unit as exposed wood. It didn’t feel right. But it was nothing that a Festool Sander and some more painting couldn’t fix! I painted the top of the unit in Palmetto (first treating any knotted areas with BOSS) and sanded off the paint on the 2nd row of drawers (using my trusted Festool sander) and treated and stained them in the same walnut stain as the top row. This looked so much better and I am really pleased I went back and redid it rather than leave it as it was.
I toned down the colour of the sides of the drawers that were still waxed by adding a light covering of brown wax.
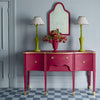
Finally, I worked out where the handles should be placed (after bashing the drawers up a bit - this is why you should work out handle placement before you start painting if possible!) and I absolutely love the Bombay Duck handles I used. They are a designer handle that comes at a premium price but my goodness they finish off the piece perfectly!
Now you'll be expecting a beautifully staged photo of the final look. But this is Shabby Nook and we keep it real! The truth is, running a full time business, both online and offline, means I have to paint around many other tasks. So it's not quite finished. I am nearly there but the top needs a little touch up and the final drawer (which got bashed when I was playing around with handle placement) is in the process of being finished up. It will be finally finished early next week!!

So... what do you think so far? Have you perfected your Polyvine technique yet? What else would you like to see in our newsletter?
-
Posted inNooky Gossip


Please upload banner from store admin blog pages